Wednesday, December 13

Lawn Fawnatics Challenge # 18 - Emboss Resist (waving Hello)

Happy Wednesday! Hope you are all doing well. I'm back today with a second project as a Guest Designer on the Lawn Fawnatics Challenge Blog. The current challenge is Emboss Resist. 


My first card was Holiday themed - you can see that here and here in my last blog post.  I decided to get summery with this card and created a water colored background to highlight my embossing and the adorable mermaid from Lawn Fawn's Mermaid for You Stamp Set.
I embossed the fish and "bubbles" with Hero Arts white embossing powder and once that was heat set, I water colored the background with several distress inks. I love how the water coloring pooled in the fish and the bubbles giving them a darker shade. Here's a close up of my card. 
I have had so much fun as a Guest Designer for this challenge and I hope you have been inspired to give the technique a try! You'll love the results! Please stop by the Lawn Fawnatics Blog to see more ideas using Emboss Resist.
Thanks for stopping by and have a great week!!

Supplies Used: 

Lawn Fawn
  • Mermaid for You Stamps & Dies
  • LF Ink: Fake Tan
Other
  • Hero Arts White Embossing Powder
  • Distress Watercolor Cardstock
  • Distress Inks
  • Stickles
  • Misti Stamping Tool

Monday, December 4

Guest Designer for Lawn Fawnatics Challenge # 18 - Emboss Resist

Hello and Welcome December!! 
I'm honored to be Guest Designing this month for the Lawn Fawnatics Challenge Blog. I created two cards for Challenge #18 - Emboss Resist.

I love this technique - it's an easy way to add detail to a project. Here's my first card using a combination of Lawn Fawn stamps and dies.
I stamped snowflakes onto my blank card base using white embossing powder and once it was heat set I blended some Lawn Fawn inks over the background. The embossed snowflakes resist the inks and stand out on the inked background. 
Be sure to stop by the Lawn Fawnatics blog and check out all the Design Team projects for more ideas using the Emboss Resist technique.
I will be back December 13th to share my second card for this challenge.
Thanks so much for stopping by and I hope you have a great week. 


Supplies Used: 

Lawn Fawn
  • Critters in the Arctic Stamps & Dies
  • Happy Howlidays Stamps
  • Stitched Hillside Borders Dies
  • Winter Village Stamps & Dies
  • Lawn Fawn Inks: Merman, Peacock, Fish Tank
Other
  • Memento Black Ink
  • Hero Arts White Embossing Powder
  • Neenah Solar White Cardstock
  • Copic Markers
  • Misti Stamping Tool

Friday, November 24

Lawn Fawnatics Challenge # 17 - Color Inspiration

Happy Friday!! Hope you had a lovely Thanksgiving Day with family and friends!! If you are braving the stores for Black Friday, ENJOY!! My Thanksgiving reminded me how thankful I am to have family close by and how great it is to gather together and simply enjoy the day. I'm very blessed.
I am also thankful to have art in my life. Creating is soothing, inspiring and especially fun when done with other creative souls! I am currently loving all the Lawn Fawnatics Challenges - it has pushed me to use stamp sets I haven't touched yet and to practice with my Copic Coloring. The current challenge is a Color Inspiration Board. 
 
I used all the colors and a gift image as the inspiration for my holiday card. I used the Beary Happy Holidays Stamps & Dies - it's an adorable set and a must have for your Holiday cards. Here's my card.

Lawn Fawn's Stamp and Die Sets make creating a scene on a project easy and I love how sweet the bears are in this set. 
Thanks for stopping by and I have some exciting news to share on my next blog post ... stay tuned!!


Supplies Used:

Lawn Fawn
  • Beary Happy Holidays Stamps & Dies
  • Winter Village Stamps & Dies
  • Outside In Stitched Rectangle Stackables
  • Stitched Hillside Backdrop - Portrait
  • Stitched Hillside Borders
  • Let's Bokeh in the Snow Petite Paper Pack
  • Peace Love Joy Petite Paper Pack
  • Perfectly PLaid Fall Petite Paper Pack
  • Perfectly Plaid Christmas Petite Paper Pack
Other
  • Neenah White Cardstock
  • Copic Markers
  • Memento Tuxedo Black Ink
  • Misti Stamping Tool

Thursday, November 23

Thanksgiving Day

Hello and Happy Thanksgiving! I'm looking forward to Family time this afternoon including visiting my Dad in the nursing home - he is always greatly missed at home but especially on the Holidays. Then onto my Brother and SIL's for more great company and some amazingly delicious food. Calorie restraint might be hard today - Thanksgiving is one of my FAV feasts! So much to be Thankful for. 
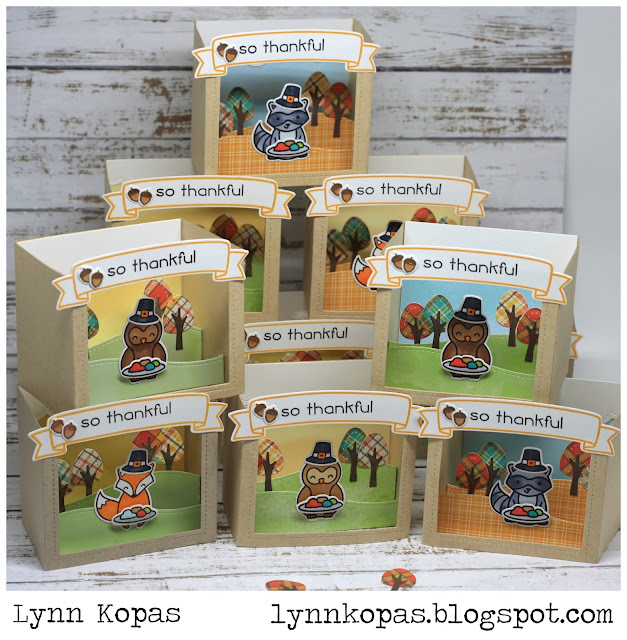
I'm also Thankful to have a great crew at work. To show them how grateful I am for them I made a bunch of cards using Lawn Fawn's Shadow Box Die. These box cards are so adorable and fold to fit in a standard sized envelope. I made twelve of these cards for my awesome co-workers. Here's a peek at some the cards.
A close up of one of the boxes.
These were so fun and easy to put together thanks to the Shadow Box Card Die, which can be used for any occasion. 
Thanks for stopping by and I wish you all a blessed and grateful Thanksgiving! 

Supplies Used: 

Lawn Fawn
  • Mom and Me Stamps & Dies
  • Forest Feast Stamps & Dies
  • Bannertastic Stamps & Dies
  • Celebration Scripty Savings Stamps
  • Stitched Hillside Backdrop - Landscape
  • Village Border Dies
  • Perfectly Plaid Fall Petite Paper Pack
  • Knock on Wood Petite Paper Pack
Other
  • Misti Stamping Tool
  • Memento Black Ink
  • Copic Markers
  • Big Shot Plus

Tuesday, November 14

Lawn Fawnatics Challenge #16 - Use Your Oldest Lawn Fawn Stamp Set

Hello Peeps!! I have a new card to share today using the current Lawn Fawnatics Challenge. Challenge #16 is to use our oldest Lawn Fawn set. 
I dug through my LF Stamp Sets and found my oldest one to be "Critters Down Under" released in 2012. I paired this stamp set with some new releases "Outside In Stitched Square Stackables" and "Stitched Woodgrain Backdrop". I used some bright Copic Markers to color the elements on my card.
I layered the adorable critters on top of each other and added a leaf to the bird's head - they make quite the Happy Birthday gang, don't they?!?! The Woodgrain Backdrop die easily adds great texture to plain cardstock.
Be sure to stop by the Lawn Fawnatics Blog to check out the DT sample and all the amazing entries for this current challenge.
Thanks for stopping by and have a great week. 


Supplies Used:

   Lawn Fawn

  • Critters Down Under Stamp & Die Set
  • Let's Play Stamp & Die Set (sentiment)
  • Stitched Woodgrain Backdrop Die
  • Outside In Stitched Square Stackables
   Other
  • Misti Stamping Tool
  • Sizzix Bigshot
  • Memento Tuxedo Blank Ink 
  • Neenah Solar White Cardstock
  • Neenah Desert Storm Cardstock 
  • Copic Markers


Wednesday, October 25

Lawn Fawnatics Challenge # 15 - Clever Gift Packaging


Hello and Happy Wednesday! I hope you are all doing well. I have a few new projects to share based on the current Lawn Fawnatics Challenge - "Clever Gift Packaging".

 I created a fall themed Scalloped Treat Box and Goodie Bag. Both could be used to hold a few yummy treats and the goodie bag is perfect for a gift card. I used paper from the new Perfectly Plaid "Chill" 6x6 paper pack to create my gift packages. 

Here's a close up of the Scalloped Treat Box. I used the Jump for Joy Stamp & Die set to create the fun scene on the box. 

The Goodie Bag Die is  a quick way to make an adorable treat bag. Here's a close up of the bag.

Come join in on the latest Lawn Fawnatics Challenge. Stop by the blog to see all the clever gift packaging projects!!
Thanks for stopping by and see you soon!! 

Supplies Used:

   Lawn Fawn
  • Scalloped Treat Box
  • Scalloped Treat Box Winter House Add On
  • Goodie Bag Die
  • Jump for Joy Stamp & Die Set
  • Forest Feast Stamp & Die Set
  • Scalloped Circle Stackables
  • Stitched Circle Stackables
  • Perfectly Plaid Chill 6x6 Petite Paper Pad
  • Aquamarine Lawn Trimmings
  • Doe Ink Cube
  • Stamp Shammy

   Other
  • Misti Stamping Tool
  • Neenah Solar White Cardstock 
  • Tuxedo Black Memento Ink

Wednesday, October 11

Lawn Fawnatics Challenge 14 - Happy Little Critters

Hello. I'm back today with another card based on the current challenge over on the 
Lawn Fawnatics Challenge Blog. The current challenge is to use Lawn Fawn's ADORABLE critters on a paper craft project. How easy is that! So many critters to choose from. 

I stayed in the Fall/Thanksgiving theme when I created my card. I combined several sets of Lawn Fawn Stamps an Dies and here's what I created. 
I love the new Stitched Hillside Backdrop Die. It's a great base to create a scene on a card. I layered puffy cloud borders to add dimension without making my card too thick. 
Here's a close up of the adorable mice.
Pleases stop by the Lawn Fawnatics Blog to join in and check out all the adorable entries to the current challenge. 
Thanks for stopping by and have a great week!! 


Supplies Used:

Lawn Fawn:

  • Stitched Hillside Backdrop - Portrait
  • Forest Feast Stamps & Dies
  • Thankful Mice Stamps & Dies
  • Mom and Me Stamps & Dies
  • Elphie Selfie Stamps & Dies
  • Puffy Clouds Border
  • Knock on Wood Petite Paper Pack
  • Watercolor Petite Paper Pack
  • Lawn Fawndamentals Ink Cubes - Walnut, Hippo, Doe
  • Stamp Shammy
Other:
  • Bigshot Plus
  • Misti Stamping Tool
  • Neenah Solar White Cardstock

Wednesday, September 27

Lawn Fawnatics Challenge #13

Happy Hump Day! I'm back today with a new card based on the latest challenge over on the 
Lawn Fawnatics Blog. This challenge is based on a Fall Inspired Mood Board. 


I just received a few new Lawn Fawn stamps and dies so I put them to use to create a Thanksgiving themed card. The Forest Feast Stamp and Die Set is perfect for fall themed cards. I pulled the colors from the mood board to create my card.


Here's a close up of the cute critter family feasting on Thanksgiving dinner.


I'm so loving the Lawn Fawnatics challenges and I hope you'll stop by and participate too!!
See you soon and thanks for stopping by!! 


Supplies Used: 

   Lawn Fawn:
  • Bannertastic Stamps & Dies
  • Forest Feast Stamps & Dies
  • Stitched Woodgrain Backdrop Die
  • Stitched Hillside Backdrop Die: Landscape
  • Perfectly Plaid 6 x 6 Petite Paper Pack 
  • Watercolor Wishes 6 x 6 Petite Paper Pack
  • Carrot, Walnut, Black Licorice Inks

   Other:
  • Misti Stamping Tool
  • Copic Markers
  • Neenah Solar White Cardstock

Monday, September 11

A Challenge to Spark My Creativity

So, I just blew the dust off my blog. It's been WAY TOO LONG since I posted!! I hope I remember how to do this LOL!! Here's why I've been away for awhile.
I've been focused on getting my butt in shape and eating better. Then the summer came and I was outdoors as much as possible! I started working with a personal trainer a few months ago and he's been helping me get stronger! Our summer in New England is too short so I wanted to embrace as much of it as possible. Now that the days are a bit shorter it's time to return to my studio and get crafting! 
I have been creating cards and mixed media projects for the cutest local shop called Reverie and Merchant Maker located in Foxboro, Ma. If you are local, please stop by. They have adorable children's clothes, jewelry, soaps, handmade signs, and lots of other items created by local artisans. I now have some Fall items in the store if you'd like to visit. 
Recently a friend and I got together to get crafty and we decided to participate in a bi-monthly challenge over on the Lawn Fawnatics blog. The current challenge is to "Create a Scene". Lawn Fawn makes lots of great scene building die sets along with stamp sets that are perfect for putting together happy little vignettes on cards and crafts! I decided to make a scene with one of Lawn Fawn's newest die sets "Shadow Box Card" die. This set creates a super cute 3D card that folds and fits perfectly into an A2 envelope. Then the recipient has a nice surprise when they open up the card and see all the dimension! I used some Lawn Fawn Halloween stamps and dies to help create my scene. Here's my card: 
Here's a side view of the shadowbox card including a peek at the fun new Cute Cobweb die which includes an "adorable" spider.
Another view looking into the shadowbox to see all the dimension.
This was fun to create and so easy with the Shadow Box Card die. I will definitely use this die over and over for seasonal cards. 
Please stop by the Lawn Fawnatics blog to see all the creative cuteness from this challenge and I hope to be back on my blog soon before the dust settles again!! 
Thanks for stopping by and have an awesome day. 


Supplies Used:

      Lawn Fawn:   
  • Shadow Box Card Die
  • Bannertastic Stamps and Dies
  • Cute Cobweb Die
  • Spooktacular Stamps and Dies 
  • Water Wishes Petite Paper Pack
  • Black Licorice Ink
  • Stamp Shammy


      Other:
  • Misti Stamping Tool
  • Copic Markers
  • Wink of Stella Brush Pen
  • Black Cardstock
  • Green Paper from my stash


Friday, March 17

Happy St. Patrick's Day!! Hello Crop on the Cape 2017!!

Hello! Time to dust off my blog and bring it back to life!
I'm so excited to be spending the weekend with a great group of crafty friends. This is our annual Crop on the Cape and it's a wonderful time to reconnect - good for the heart and soul!! I'm hoping to be somewhat productive - we'll see how that goes.
Since today is St. Patrick's Day I'm sharing a few cards I made awhile ago with Lawn Fawn's adorable "My Lucky Charm" stamps and dies. I used my Copics to color in the cute cat and four leaf clovers. Here's my first card. (The pics were taken at night and at work with my iphone so not the best quality)
I used some vellum to add a soft feel to the card. The title is white embossed. It was fun to use my Copic markers again.
Here's my second card.
I used darker greys for this cat and added some stars from the stamp set. Here's a close up.
Thanks for stopping by and I'm hoping it won't be another month without a blog post.
Happy St. Patrick's Day and Happy Weekend!!

Tuesday, February 14

A Crazy Valentine's Day!

Happy Valentine's Day! I've been working on a little Valentine's surprise treat for my coworkers. Most of my coworkers have a dog or cat or both so I thought it would be fun to create some ATC's using Tim Holtz Sizzix "Mini Crazy Cats and Dogs" Cling Stamps and Framelits Die Set. The mini set is a "purrfect" size for ATC's and the coordinating framelits made creating 13 of these much easier! I started with a watercolor background using different shades of red and pink distress inks. I then stamped the dogs and cats with the Misti Stamping Tool. I colored the critters with Copic Markers. I stamped a quick sentiment and added some small hearts punched from the water colored paper. I colored the small hearts with a Wink of Stella brush to add an extra pop of glitter.  Each ATC looks different - that's one of the many reasons I LOVE watercoloring!! Here's a peek of them together followed by close ups of each ATC. 
I have to admit, creating 13 of these: 10 for my coworkers, 2 for friends and 1 for me, was fun!! Having the coordinating framelits and the Misti Stamping Tool made it so much faster. I'm still working on my Copic Skills so this was GREAT practice. 
Here's some close ups of the crazy critters.
I love the grey and pink combo - I used Picked Raspberry for a few of the backgrounds. 
Here's the crazy doggies.
I made a few ATC's with the dog below coloring him in different color combinations. 
Here's a lighter version of him.
I love how goofy this guy is - he's the party dog!
Here's the last pup.
Thanks so much for stopping by and I hope you have a crazy, fun Valentine's Day!!

Friday, January 27

Valentine's Day Cards with Valentina by Bella Blvd.

Howdy Peeps! Happy Friday!
I've been working on Valentine's Day Cards and this past week I created a few more using Bella Blvd's "Valentina" collection. These papers are so bright and happy! I used Lawn Fawn's Crossed-Stitch Dies to create pretty borders for my cards. Here's my first card followed by a close up.

I added an extra small heart and colored it with stickles to add some sparkle to my card.
My second card is super simple but a perfect card for a sweetie.
I again added a little heart and colored with it stickles for some glitter.
These cards were easy to make and will make a perfect homemade treat for the special Valentines in your life!!
Thanks for stopping by. Have a great week and I'll see you soon!

Thursday, January 19

Craft Room Happenings

Hello Everyone! Happy Thursday. 
I've been busy in the studio this week creating cards, just in time for Valentine's Day. I started with a trio of cute cards using Lawn Fawn's "Stinkin Cute" Stamps and Dies and Tim Holtz Distress Inks and Watercolor Cardstock.  I water colored swatches of Distress Inks on watercolor cardstock. Once dry, I grabbed my heart punch and punched out a bunch of hearts. They became the base for my cards. Then, using the Misti Stamp Tool  I stamped several ADORABLE little skunks from the Lawn Fawn "Stinkin Cute" stamp set. I colored the skunks with my Copics and then die cut them with the coordinating Lawn Fawn Dies. Here are my cards.
I created an ombre effect with the hearts on one card and kept the hearts on another card more monochromatic.
The hearts that the cute skunks are holding have Stickles on them to add a punch of sparkle. 
I "loved" creating these cards and it's so easy with Lawn Fawns Stamps and Dies! 
I'll be back with more Valentine's Cards next week using Bella Blvd. "Valentina" collection. 
Enjoy the rest of the week and especially the weekend!! 
Thanks for stopping by and I'd love to hear from you.

Wednesday, January 11

A New Journey ....

Well Hello Everyone! Welcome 2017! I took a bit of a blog break after the Holidays and enjoyed some family time and some down time as well. For the first time in a LONG time I'm not on a design team. It's kind of an empty feeling if that makes sense, but also a liberating feeling. My time is mine now to do whatever I want. If a design team opportunity opens up, I'm all over it but in the meantime, it's time to focus on me ... my health especially! 
Since my Birthday in October of 2016 I embarked on a new nutrition journey. I thought, sure I'll try this one - we'll see what happens. Now, 3 months later, I'm 20 lbs, lighter, have more energy, sleep better and feel sooooo good!!! My digestive issues are resolved, my arthritis is better and I feel happier! Several of my co-workers are on this journey with me which is great and we have each other's support. This is a journey I'm beyond glad I took and will continue to take to stay healthy. It's amazing how much nutrition plays a role in our health.
Eating healthy is the best medicine for you body. You have more energy, sleep better, are more focused and perform better.
My diet is now a plant based program that detoxes my body and replenishes it with healthy nutrition. It's easy, delicious AND it works. Yes, I have an occasional adult beverage, dessert and over indulge once in awhile. Then I jump right back into the program and I'm back on track in no time.
The other benefit to my weight loss is clothes! Clothes look so much better on me now. I have more options, I have more confidence in what I look like and nothing feels better that that!! I'm trying a new clothing subscription. I have done a ton of research and thought I would give this one a try. It's called Stitch Fix. I received my first Fix this week and was pleasantly surprised!! You can try on and keep what you like in the comfort of your own home, and send back what doesn't work in a prepaid mailer - easy peasy. The clothing is unique and trendy and so comfortable. Give it a try!! Here's a referral code if you'd like to save some $$ on your first order. 
I will still be crafting - in fact I'm working on my third commissioned canvas for a friend. I'm creating cards and playing in my planner. I'm sure I'll continue with project life, just not as often. 
So thanks for listening and if you are interested in more information on either my nutrition program or on Stitch Fix, please let me know - I'll be happy to answer any questions!!
Happy 2017!!
BLOG CREDITS