Showing posts with label My Mind's Eye. Show all posts

Tuesday, April 12

One Sketch + One Kit = a fun Scrapbook Page!

Howdy Bloggers! I'm up on the Noel Mignon Blog today with a layout based on a fun sketch from Let's Get Sketchy. This month the Noel Mignon Design Team is teaming up with Let's Get Sketchy. We are creating pages using two of their sketches all month long. Here's my page using the last bits and pieces from Noel's "Picture Perfect" Classic Kit.
Here's the Let's Get Sketchy sketch my page was based on.
I have lots more closeups of my layout on the Noel Mignon Blog and info on a chance to win a Noel Mignon Kit by participating in this month's Let's Get Sketchy sketches. For details  click >>> here.
Thanks so much for stopping by and I hope you have a great week!! I'll be back soon with more crafty stuff!! 

Tuesday, April 5

"Trailblazer" Classic Kit Sneak Peek

Hey Everyone. I'm going to keep this short ... I'm up on the Noel Mignon Blog today with a layout featuring the latest Trailblazer Classic Kit. I am in love with this kit - it's ideal for travel photos and the color palette is yummy! Here's a peek of my layout.
I have lots of close ups on the blog and info about grabbing one of these kits and info about the current kit subscription! Stop by the blog for more details and to check out our latest challenge this week! 
Have a great Tuesday and thanks for stopping by!!!!!

Saturday, September 19

Just can't get enough!

The weekend is here and it's still warm and summery!! I'm in NO hurry for summer to end!
I wanted to share my latest Project Life page using Noel Mignon's Show and Tell Daily Dairy Kit! I used LOTS of My Mind's Eye My Story products. This collection is STUNNING and I can't get enough of it!! Here's my page ...
 
I'm Lovin' all the gold elements in this collection. I have lots of close-ups and a few tips on the Noel Mignon blog today so please stop by and say hi!
Enjoy your weekend and I'll return this Tuesday with another PL page using the same awesome kit!! 

Tuesday, September 8

Show and Tell

Hope you all had a great Labor Day Weekend! I had a relaxing one, including some time in the sunshine!  Summer, please don't fade out too quickly. We love you here in New England!
I have a new project over on the Noel Mignon Blog using September's Show and Tell Daily Diary Kit. The inspiration came from back to school pocket file folders, shrunk down to hold Project Life Cards. Here's the cover ...
Inside there are a total of six cards and tags. Here's a peek ...
This was so much fun to create. For a close-ups of the cards, please stop by
Noel Mignon blog to check out the details. I'd love to hear from you if you have time! Have a great week and I'll be back soon with more projects using this AWESOME kit!

Monday, May 4

National Scrapbook Day and New Prima Doll Tags!

Happy Monday Everyone. Hope you all had a great weekend and to all my crafty friends hope you had a productive National Scrapbook Day! I spent Saturday morning teaching a canvas class at Jenn Shurkus's lovely loft. Jenn and Chris's daughters created adorable canvases based on one I created last month for the Design Team over at Mixed Media Monthly Challenge Blog. Here's what they created ...


I love how each one is different even though all the products were the same. I also loved how the girls wanted to make them their own! They all waited to find the right word to add to the canvases to make it unique to them. It was so much fun and a great way to celebrate National Scrapbook Day! I also worked on a travel mini album to celebrate my trip to Bermuda in 2013. This will be a gift and I will share once I put the finishing touches on it!
Last month I created two brand new Prima Doll Tags using Julie Nutting's new Doll Stamps. I have made lots of these tags with Julie's stamps and I still love creating them. The first tag showcases "Jill" one of the newer stamps by Julie Nutting. I used Crate Paper's "Confetti" collection to create the scene for my tag and added the adorable dog as well - coordinated to match Jill, of course!
 
 
Here's a close up of the little dog all dressed up to walk in style ...
 
 
For the second tag I used "Rita", another newer doll stamp. I LOVE her dress and how stylish she is. She looks confident. I used My Mind's Eye "Jubilee" papers for Miss Rita.
 
 
For her dress, I re-stamped a few sections of her dress and popped them up with foam tape to give the dress more dimension.
 
 
I love little banners for detail and I added some gold thread under the button to go with the gold dots on her dress.
 
 
These tags are so fun and easy to create.
Thanks for stopping by today and I hope your day is a good one! See you soon!

Wednesday, January 28

5 for 5 Blog Event: Valentine's | Day 3

Welcome to Day 3 of our 5 for 5 Blog Event.
Each day for 5 days our 5 Designers will post one Valentine's Inspired Project based on a theme. Some of us will be offering prizes - MYSELF INCLUDED - stay tuned!! The theme for today is "Arrows". I created another card today - I am fairly new to card making but I really enjoy making them! For this card I continued to use My Mind's Eye "Cupid's Arrow" papers. I used Lawn Fawn's Stitched Rectangle Stackables to create several layers for my card. I love the stitched look and the stackable dies are fun and easy to use! Here's a close up of the stitched look ...

And here's my card...
 

The smallest layer is backed with fun foam for dimension - a great tip I picked up from
Jennifer McGuire. Fun foam is very inexpensive and the same thickness as foam tape. It's great for a solid backing of an element or photo and is more cost effective. I still use foam tape ALOT, but this is a great supplement to make your foam tape last much longer! I punched out three hearts, one out of red glitter paper and added them to the center of the card. A simple sentiment was the perfect final touch for this card!


Thanks again for stopping by and leaving your lovely comments. Please check the designers blogs below and leave some love! I will have a fun giveaway that's Valentine's Day related. Simply leave a comment on my blog for each 5 days and I will randomly choose a winner!! Hopefully we are inspiring you to create some Valentine's projects! See you tomorrow!!


5 for 5 Designers:
Lynn Kopas <<< you are here

Monday, January 26

5 for 5 Blog Event: Valentine's | Day 1

Hello Everyone! Hope you are all doing well and had a great weekend. I hunkered down and finished some projects - deadlines can be quite motivating! It was a perfect weekend for crafting since we had a mild snow/rain storm on Saturday - mild for New England that is! We have been lucky so far this winter - however that is due to change today and into Tuesday ... we're always on our toes!!  
I have a new crafty endeavor I'm very excited about and it starts today! I want to welcome you to a new Blog Event  - "5 for 5"! A few designers, 5 to be exact, will create Holiday Inspired projects for, you guessed it, 5 days in a row! Each day our 5 Designers will post one Holiday Inspired Project based on a theme. Some of us are offering prizes, so be sure to visit all the blogs listed below and leave a comment.
So, without further ado, Welcome to Day 1 of our 5 for 5 Blog Event! This month's event runs from January 26th (today) until January 30th and is based on Valentine's Day.


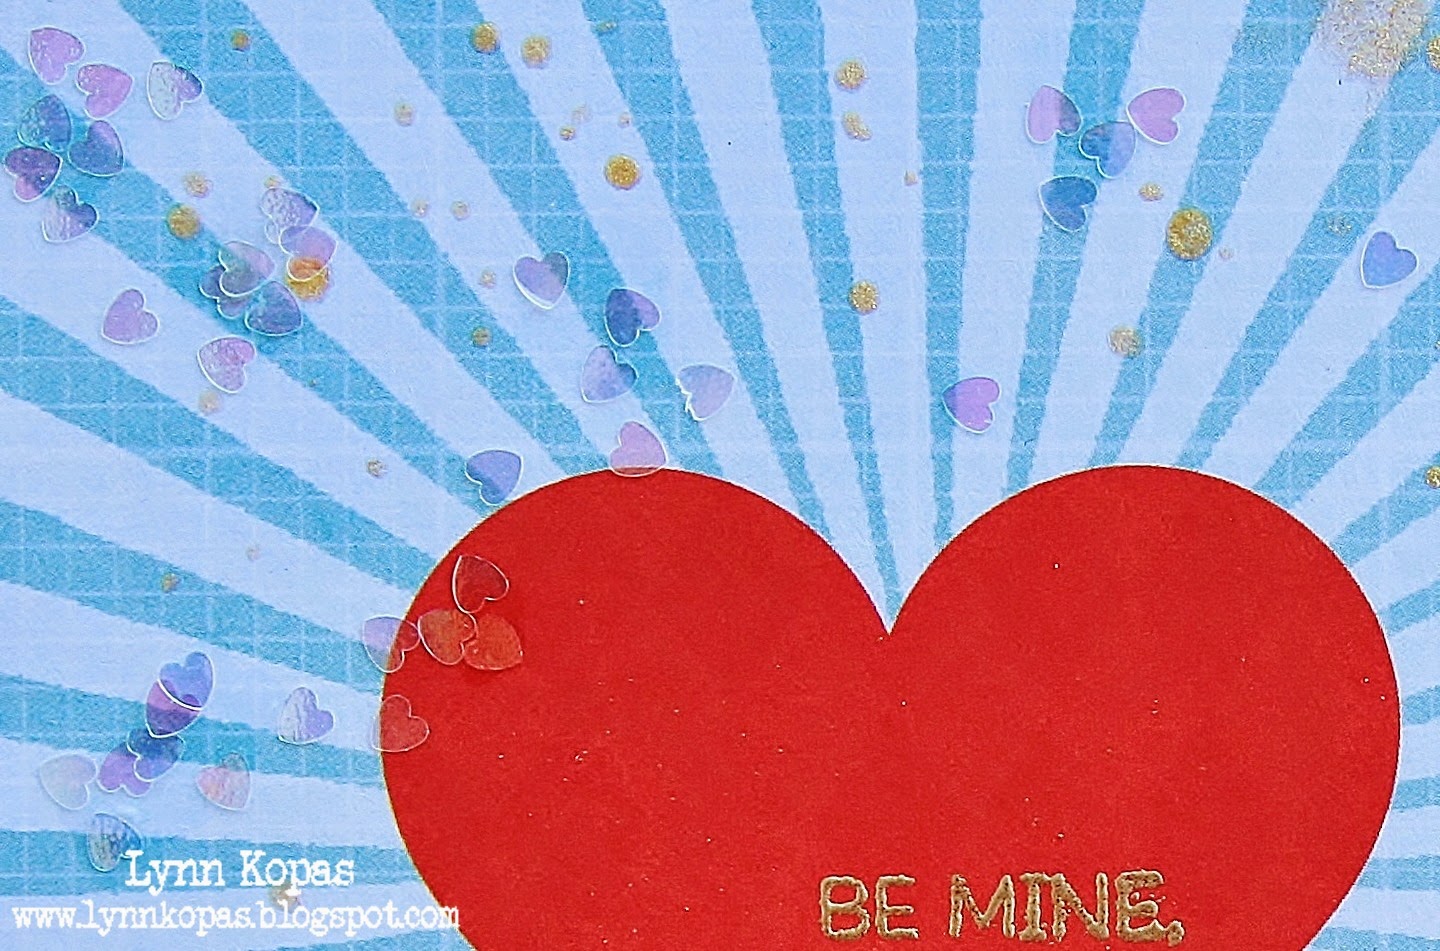
Today our theme is "Hearts". I created a simple square card (4.5 x 4.5) by layering some older papers from My Mind's Eye "Cupid's Arrow" collection. I used the heart on the back of the "Confetti Hearts Foiled Paper" as the focus of the card.


I embossed the sentiment "Be Mine, Valentine" with gold embossing powder.


To add more gold I spattered some Heidi Swapp Color Shine in Gold onto the card - masking off the heart to keep the splatters off of it.
For a final touch, I added some fun Martha Stewart Iridescent Heart Glitter from a set I picked up at Michael's with a coupon.


This card was very easy to put together and perfect for today's theme.
Please visit the 5 for 5 Designers, check out their cute projects and leave them some LOVE!!
 

Thanks for stopping by today and be sure to stop by tomorrow for a new Valentine's Inspired themed project.

Saturday, November 22

Celebrating a New Arrival!

Hello Bloggers! Hope you are all doing well and getting ready to enjoy the weekend.
I wanted to share a project I recently created for one of our Design Team members at Mixed Media Monthly Challenge Blog. The very talented Lalo Ik recently had a baby boy so the design team decided to create projects to help celebrate the family's new arrival. We are continuing with our challenge theme this month which is using stamps on your project. I decided to FINALLY decorate a 7Gypsies shadow box I have had in my stash for years! I grabbed a My Mind's Eye Lost and Found "Sunshine" 6x6 paper pad, also from my stash, and used some burnt orange and soft blue papers to decorate the shadow box. Here's the finished project ...

 
I stamped the corrugated alpha letters with a script stamp and Wendy Vecchi's "Orange Blossom" Archival ink. I inked all paper edges and the sentiment with the same ink.

 
I wanted to use lots of balloons and did NOT want to hand cut them so I went to Michael's and grabbed a Martha Stewart Balloon punch which saved the day. Punches are expensive but I don't mind the investment if I will use it often.

 
Congratulation Lalo and family and Welcome Little One!! Have a great weekend and I'll be back soon with more craftiness!!

Sunday, July 20

Oh Ya, I have a blog ...

WOW! I should be arrested for blog neglect! My excuse is ... S U M M E R !!! I want to be outside, especially after a challenging work day. So my crafty life, including blogging, has taken a back seat. I believe I'm about a month behind on PL - but I have been taking pics and journaling events in a notebook to later translate into PL pages sometime soon. I also have a project due for an upcoming Christmas in July Blog Hop - details coming next week!
Sometimes it's good to back away and then refocus. I have some classes coming up that I'm very excited about - both Mixed Media related! I also finished up a canvas recently that I want to share. This was created for Right at Home Scrapbooking and can be a class if anyone is interested! Just let myself or Right at Home know if you are interested!! 
I wanted to continue with the girl art canvases that I've been creating but change it up a bit. The canvas is 10 x 10 deep edged and will sit nicely on a desk, shelf or bureau. I wanted to use a girl figure from the shoulders up only and focus on adding a mouth, cheeks and lots of hair. I started by sketching out a figure to achieve scale ... she will have hair, don't worry!!
 
 
I then collaged some papers from My Mind's Eye "Now and Then Dorothy" Collection. The background on this canvas is simple, unlike my previous canvases, so your eye will be drawn to the girl. I used text paper to cut out the girl and gave her a sleeveless tank top. I started shading the skin, cheeks and mouth with Faber Castell Design Memory Crafts Pitt pens and Gelatos. The subtle white on the background is a light coat of gesso I scrapped on with a palette knife ...
 
 
 For her hair I used the gorgeous Dash of Red acrylic paint from Claudine Hellmuth's Studio Paints. These paints are fluid acrylics and are easy to use. They are not heavy body paints so the brush strokes are not as easy to achieve but there are ways to add texture once you've applied the paints. Here's the finished canvas ...
 
 
I love how vibrant her hair is! To add some texture to her hair I dragged the handle end of the paint brush through her hair and added some "gesso highlights". I carried the ripped strips of paper to the sides of the canvas for more interest ...
 
 
On the right side of the canvas is a cool textural feature that is hard to see in the photo but is awesome in real life. I used Wendy Vecchi's Translucent Embossing Paste and Tim Holtz Hearts Layering Stencil to create a subtle area of  hearts down the side on the canvas. I added clear glitter to the hearts when they were still wet to add some shimmer to the canvas.
 
 
I added a headband and some beads for a necklace and she was done! Well, I hope you enjoyed some of the process with this canvas! I'm happy with it for my first girl of this size! I learned a lot and made some mistakes along the way - all part of the process!
Enjoy your weekend and I'd love to hear from you. I will TRY to keep up with my blog a bit better, but if the sun's out it's gonna be tough!!! Thanks for stopping by!!!  

Tuesday, June 17

Project Life: Week 23

Well, I haven't been the best blogger lately! I am creating but nothing I can share just yet! I'm only a bit behind on PL and I finished up Week 23 this past weekend. I used My Mind's Eye: Record It! Follow Your Heart Journaling Cards again for Week 23 - I love the color palette of this collection! I used page Design F for my layout - I Love all the 3x4 pockets in this design! Here's the entire page followed by close-ups ...


Here's the title card ... I used a fun date stamp and typed my journaling on my typewriter.
 
 
I added some washi tape and enamel dots to most of the cards ...


Thanks for stopping by and letting my share my Week 23 with you! I would love to hear from you! Have a great week and see you soon!!

BLOG CREDITS